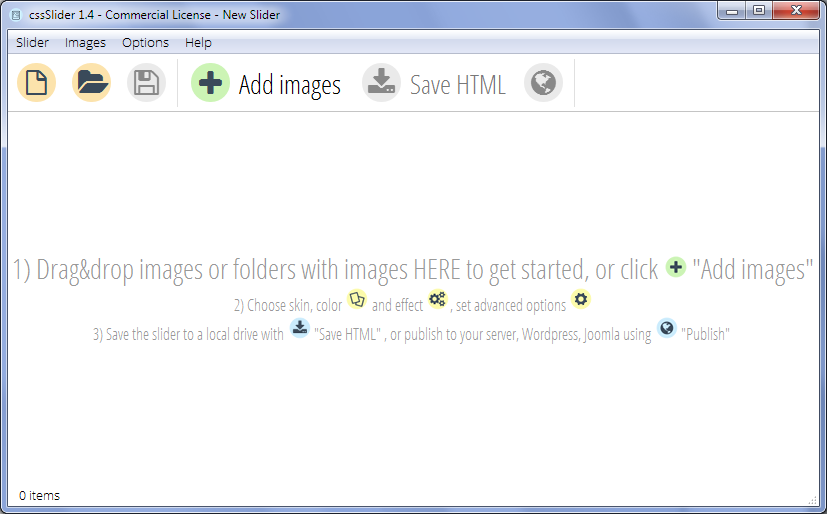
Creating a slideshow in HTML is easy with cssSlider. You can download cssSlider for windows or mac by clicking here. Open the software and you will see a blank slideshow, ready for you to add images.
Step 1: Click on the "Add Images" in the top navigation bar
You have two options for adding images. The first option is to click on the "Add images" button in the top navigation bar. This will allow you to browse through your computer and find images to use.
The second option is to drag images straight into the slideshow.
Step 2: Edit captions and settings
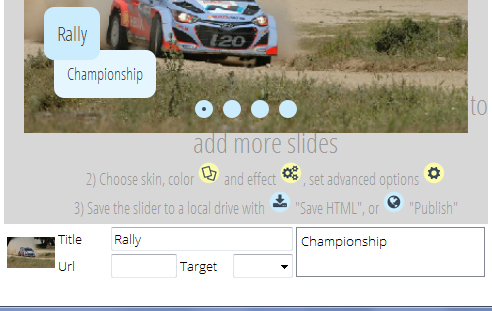
Once you’ve added images, they will appear in cssSlider on the left-hand side bar. You will also see a preview of your slideshow in the center window.
You can edit the captions very easily by changing the "Title" field below the image. There is also space for you to add a second, longer description.
Finally, you can use the "URL" field to add a web address to set the correct destination that the slide will link to.
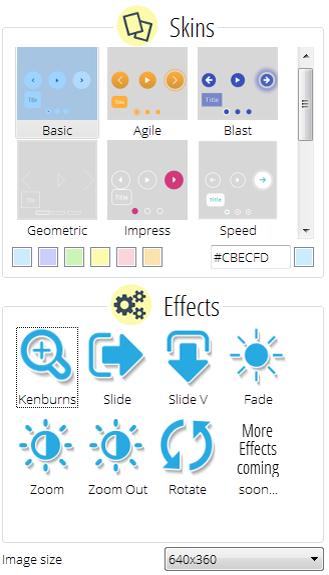
On the right side of cssSlider are a range of settings you can change.
Skins - You can pick from different skins to change the appearance of your slideshow, or change the color scheme of the skin you’ve got selected. Because there are no images used in any of the skins, you can change the color scheme to anything you want, and therefore get it to exactly match the rest of your website.
Effects - You can also change the transition effect (the effect that applies when one slide transitions to the next) and the default size of your slideshow. Your slider is responsive, so it will re-size to fit smaller screens, including smart phones and tablets.
Play with the settings until you have your slideshow looking exactly the way you want! Any changes will be updated instantly in the main window, so you can easily see the impact of different skins and settings. Of course, you don’t need to do any of this - you can just leave everything on the default settings, and you will still have a great looking slideshow!
Step 3: Click "Save HTML"
Clicking on "Save HTML" in the top navigation bar will allow you to export the HTML code for your slideshow and save it as a file anywhere on your computer. By default, your slider will also open in a browser for you to preview. Images will automatically be optimized for the web, so that they are the correct size and faster to download than your original image files
- Click "Save HTML"
- Browse to the location on your computer that you want to save the HTML file and image folder.
- Give the HTML file a sensible name
- Click "Save"
You can then edit this HTML file in your favorite editor, and add the code to your web page.
Here is the code that you should copy and paste to a body section of your web page:
<body>
...
<!-- Start cssSlider.com -->
<link rel="stylesheet" href="engine1/style.css">
...
<!-- End cssSlider.com -->
...
</body>
The generated code is pure CSS and HTML - there is no Javascript or JQuery, and it meets HTML5 technical standards.
Things to be aware of: by default the images will be saved together in a subfolder, and referenced via a relative URL. You should make sure to upload the 'data1' and 'engine1' folders to your server, and ensure that folders are in the same location that the web page is saved. Otherwise you will need to edit the relative URLs to point to the correct location of the images. You can set cssSlider to only use absolute image paths in the "Settings" window.
Bonus step: advanced options
You can save your slider straight to your FTP server, or you can save it as a Wordpress plugin. To do this, click on the "Advanced" button with the gear icon at the bottom of the settings bar on the right side of cssSlider.
You will get a new window with three tabs along the top "General", "Images" and "Publish". Click on "Publish".
To export straight to an FTP server:
- Select the option that says "Publish to FTP server" and then click on "Edit".
- Add your FTP settings.
- Fill in the FTP folder field (otherwise the HTML and images will be saved into the root of your server)
- Click "Publish"
To export as a Wordpress plugin:
- Select the option that says "Wordpress Slider"
- Browse to the location you want to save your new plugin
- Click "Publish"
- You can then add the new plugin to Wordpress in the normal way